Chapter 5.4 - Retrain the model from new data with DVC
Introduction
In this chapter, we will retrain the model using the new data we labeled in the previous chapter. We will download the annotations from Label Studio and use them to retrain the model. We will then evaluate the new model to see if it has improved.
The following diagram illustrates the control flow of the experiment at the end of this chapter:
flowchart TB
    extra -->|upload| labelStudioTasks
    labelStudioTasks -->|label| labelStudioAnnotations
    bento_model -->|load| fastapi
    labelStudioTasks -->|POST /predict| fastapi
    fastapi --> labelStudioPredictions
    labelStudioPredictions -->|submit| labelStudioAnnotations
    labelStudioAnnotations -->|download| extra_annotations
    extra_annotations -->|load| parse_annotations
    parse_annotations -->|copy| data_raw
    data_raw -->|dvc repro| bento_model

    subgraph workspaceGraph[WORKSPACE]
        extra[extra-data/extra]
        extra_annotations[extra-data/annotations.json]
        bento_model[model/classifier.bentomodel]
        fastapi[src/serve_labelstudio.py]
        parse_annotations[scripts/parse_annotations.py]
        data_raw[data/raw]
    end

    subgraph labelStudioGraph[LABEL STUDIO]
        labelStudioTasks[Tasks]
        labelStudioAnnotations[Annotations]
        labelStudioPredictions[Predictions]
    end

    style extra opacity:0.4,color:#7f7f7f80
    style labelStudioTasks opacity:0.4,color:#7f7f7f80
    style fastapi opacity:0.4,color:#7f7f7f80
    style labelStudioPredictions opacity:0.4,color:#7f7f7f80
    linkStyle 0 opacity:0.4,color:#7f7f7f80
    linkStyle 1 opacity:0.4,color:#7f7f7f80
    linkStyle 2 opacity:0.4,color:#7f7f7f80
    linkStyle 3 opacity:0.4,color:#7f7f7f80
    linkStyle 4 opacity:0.4,color:#7f7f7f80
linkStyle 5 opacity:0.4,color:#7f7f7f80Steps
Download the annotations
Make sure Label Studio is running at http://localhost:8080.
-
In the project view, click on the Export button and select
JSON-MIN.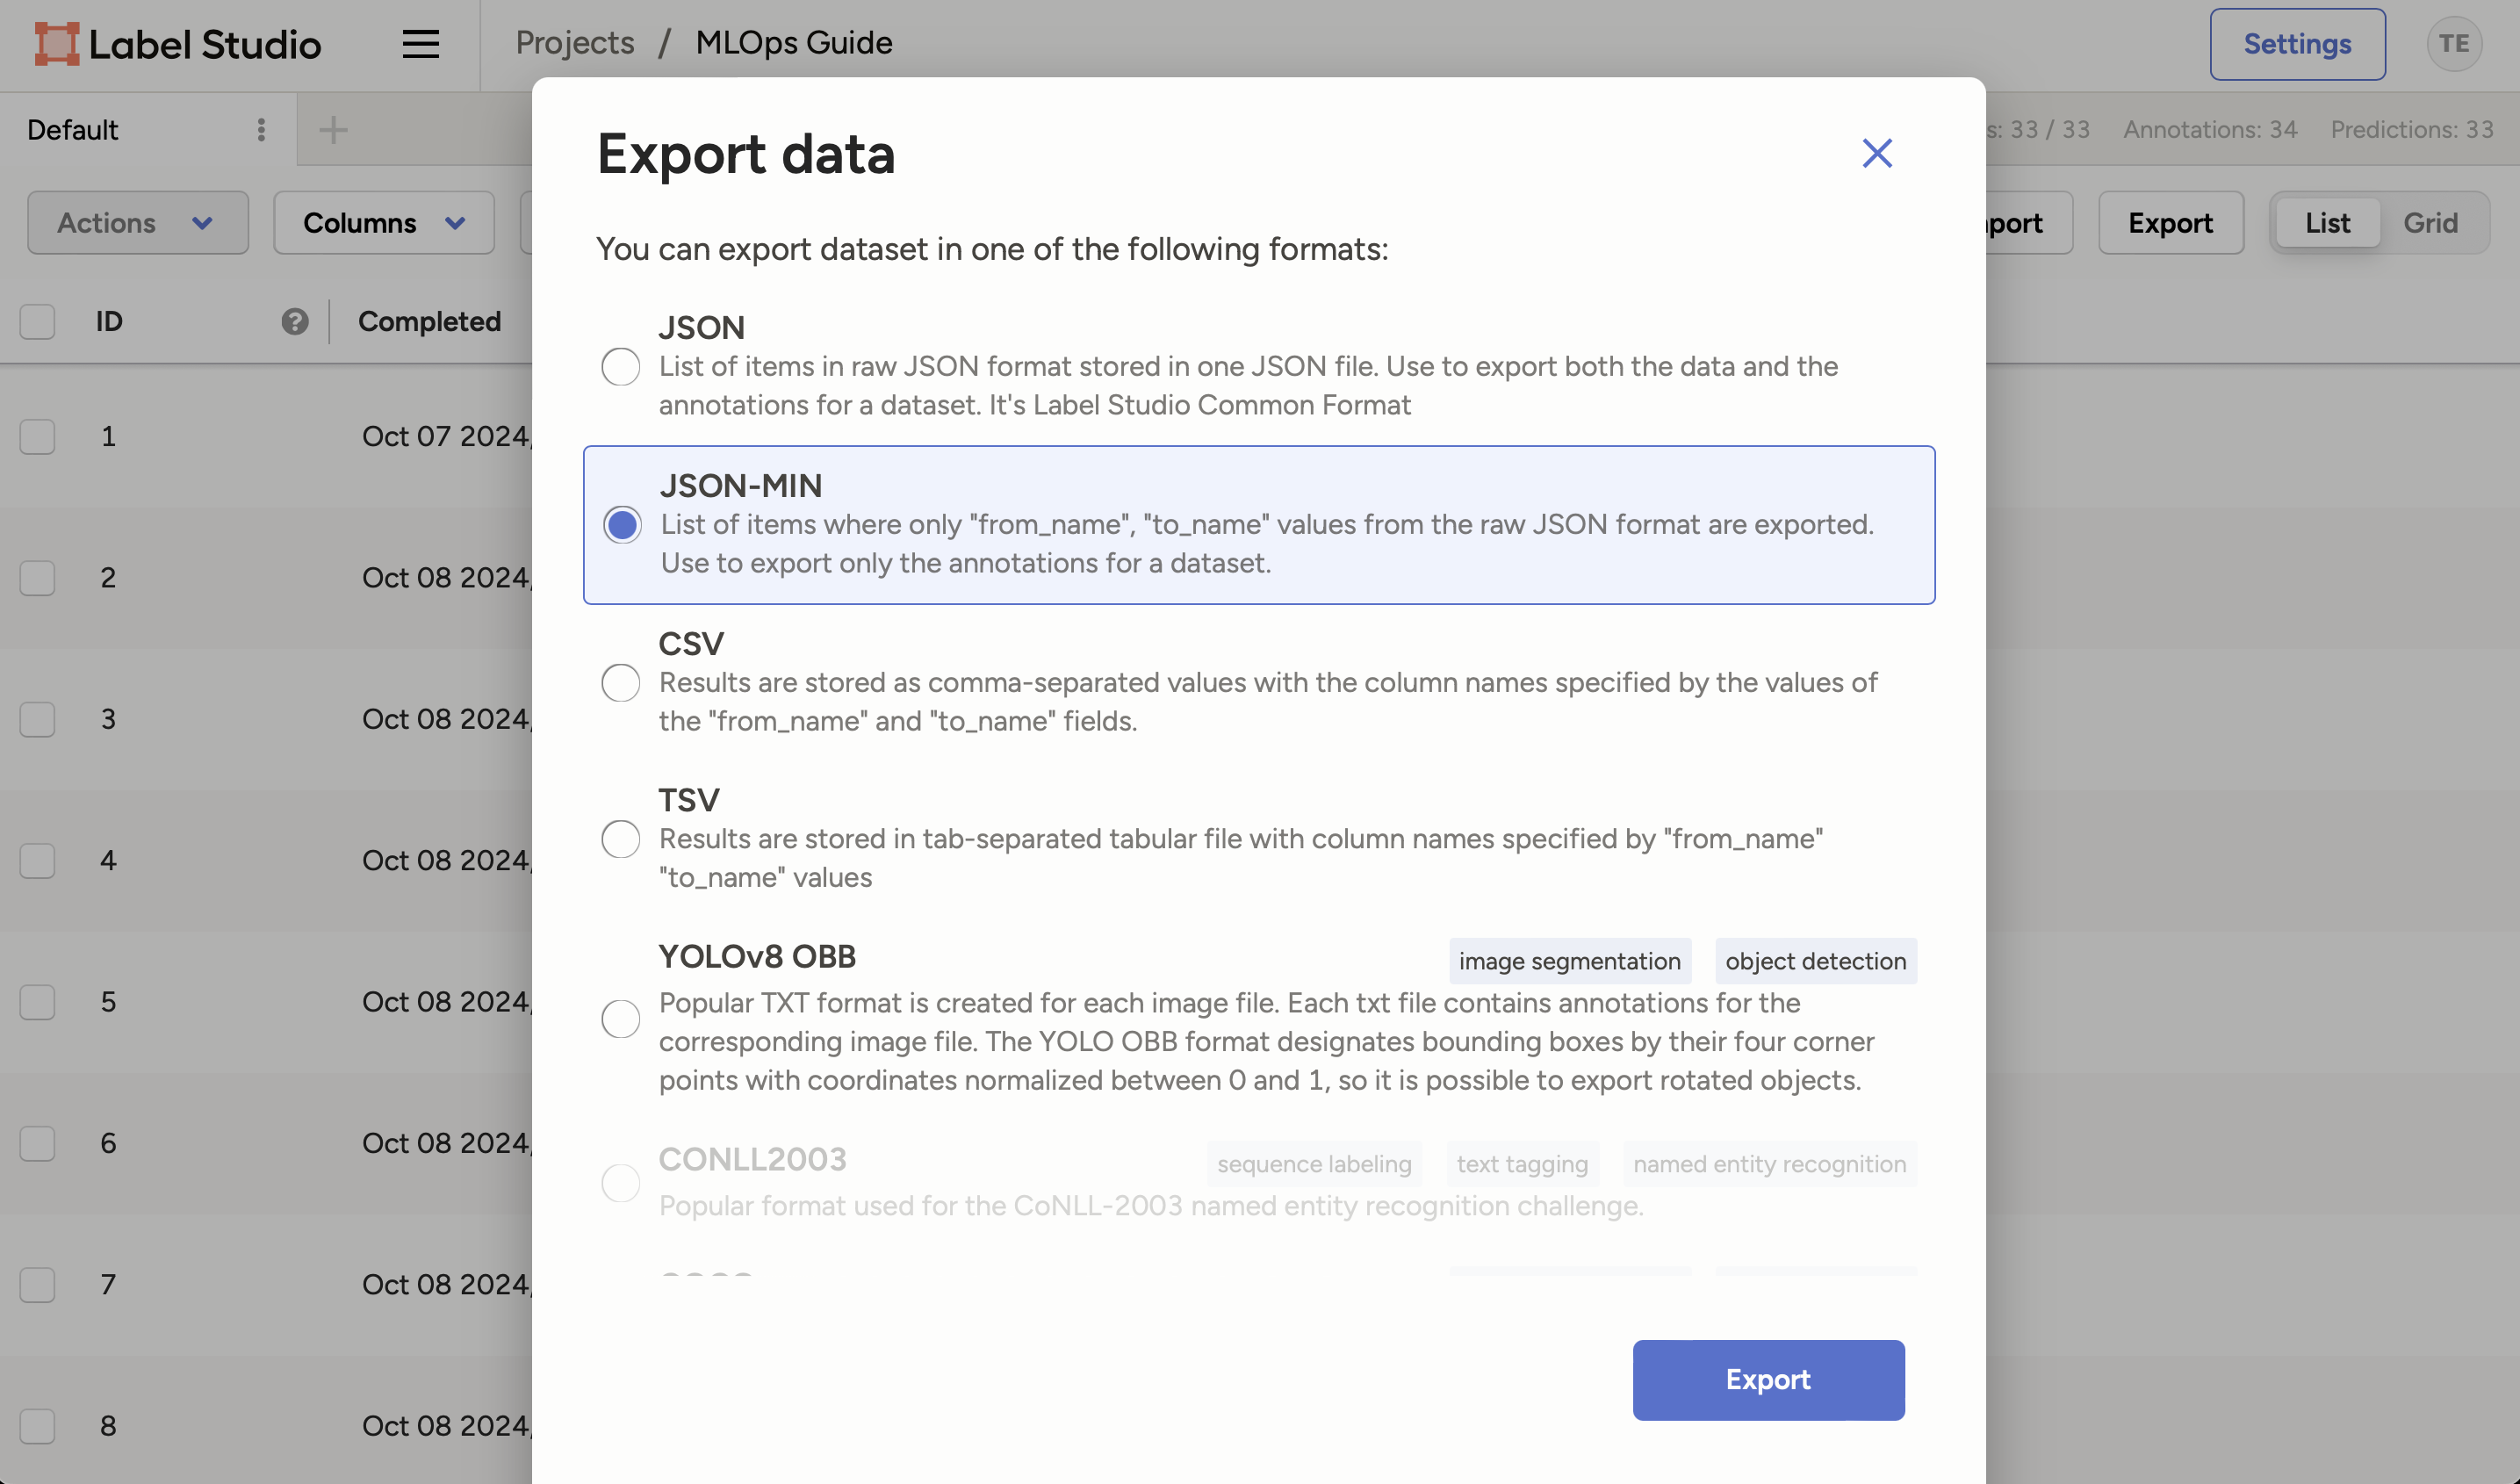
-
Click on the Export button to download the annotations.
-
Rename the downloaded JSON file to
annotations.json. -
Move the file under the
extra-data/folder.. ├── extra-data/ │ ├── .gitignore # (1)! │ ├── annotations.json # (2)! │ ├── extra/ │ ├── extra-classes/ │ └── README.md └── ...- This file keeps downloaded images and annotations out of Git.
- This is the annotations file we downloaded from Label Studio.
Parse the annotations
Label Studio exports the annotations in a specific format. We need to parse these annotations to extract the labels and the corresponding data.
For this, we will use a Python script. Create a new Python script called
parse_annotations.py in a new scripts/ folder of your repository.
import json
import shutil
from pathlib import Path

# Constants
EXTRA_DATA_FOLDER_PATH = Path("extra-data/extra")
NEW_DATA_FOLDER_PATH = Path("data/raw")

# Read annotations and copy images to annotated folders
with open("extra-data/annotations.json") as f:
    annotations = json.load(f)

for annotation in annotations:
    # Here we perform the same manipulation as `src/serve_labelstudio.py`
    # to retrieve the correct filename
    filename = "".join(annotation["image"].split("-")[1:])
    choice = annotation["choice"]

    source_path = EXTRA_DATA_FOLDER_PATH / filename
    # Note: Here we use the choice as the folder name, as
    #       this is how we organised the data
    dest_path = NEW_DATA_FOLDER_PATH / choice / filename
    dest_path.parent.mkdir(parents=True, exist_ok=True)

    print(f"Copying {source_path} -> {dest_path}")
    shutil.copy(source_path, dest_path)
The script reads the annotations from the annotations.json file and copies the
images to the corresponding folders in the data/raw directory.
You can run the script using the following command:
The annotated images will be copied to the data/raw directory. The output
should look like this:
Copying extra-data/extra/0AjMfhGdyFWR.jpg -> data/raw/Earth/0AjMfhGdyFWR.jpg
Copying extra-data/extra/0AjMfNXduVmV.jpg -> data/raw/Venus/0AjMfNXduVmV.jpg
Copying extra-data/extra/0ATMfhGdyFWR.jpg -> data/raw/Earth/0ATMfhGdyFWR.jpg
Copying extra-data/extra/0ATMfNXduVmV.jpg -> data/raw/Venus/0ATMfNXduVmV.jpg
Copying extra-data/extra/0cTMfhGdyFWR.jpg -> data/raw/Earth/0cTMfhGdyFWR.jpg
Copying extra-data/extra/0czXuJXd0F2U.jpg -> data/raw/Saturn/0czXuJXd0F2U.jpg
...
Check the changes
Check the changes with Git to ensure that all the necessary files are tracked:
# Add all the files
git add .

# Check the changes
git status
The output should look like this:
On branch main
Changes to be committed:
  (use "git restore --staged <file>..." to unstage)
        new file:   scripts/parse_annotations.py
Commit the changes to Git
Commit the changes to Git:
# Commit the changes
git commit -m "Add annotation parser script"
Retrain the model
Now that we have the new data, we can retrain the model.
Note
We run dvc repro locally here to keep the tutorial self-contained and avoid
extra cloud costs. In production, push the new labeled data (dvc add data/raw
and dvc push) to a branch and let your CI/CD pipeline retrain the model on the
Kubernetes cluster, as set up in
Part 3 - Serve and deploy.
We will use DVC:
And check the new model's performance:
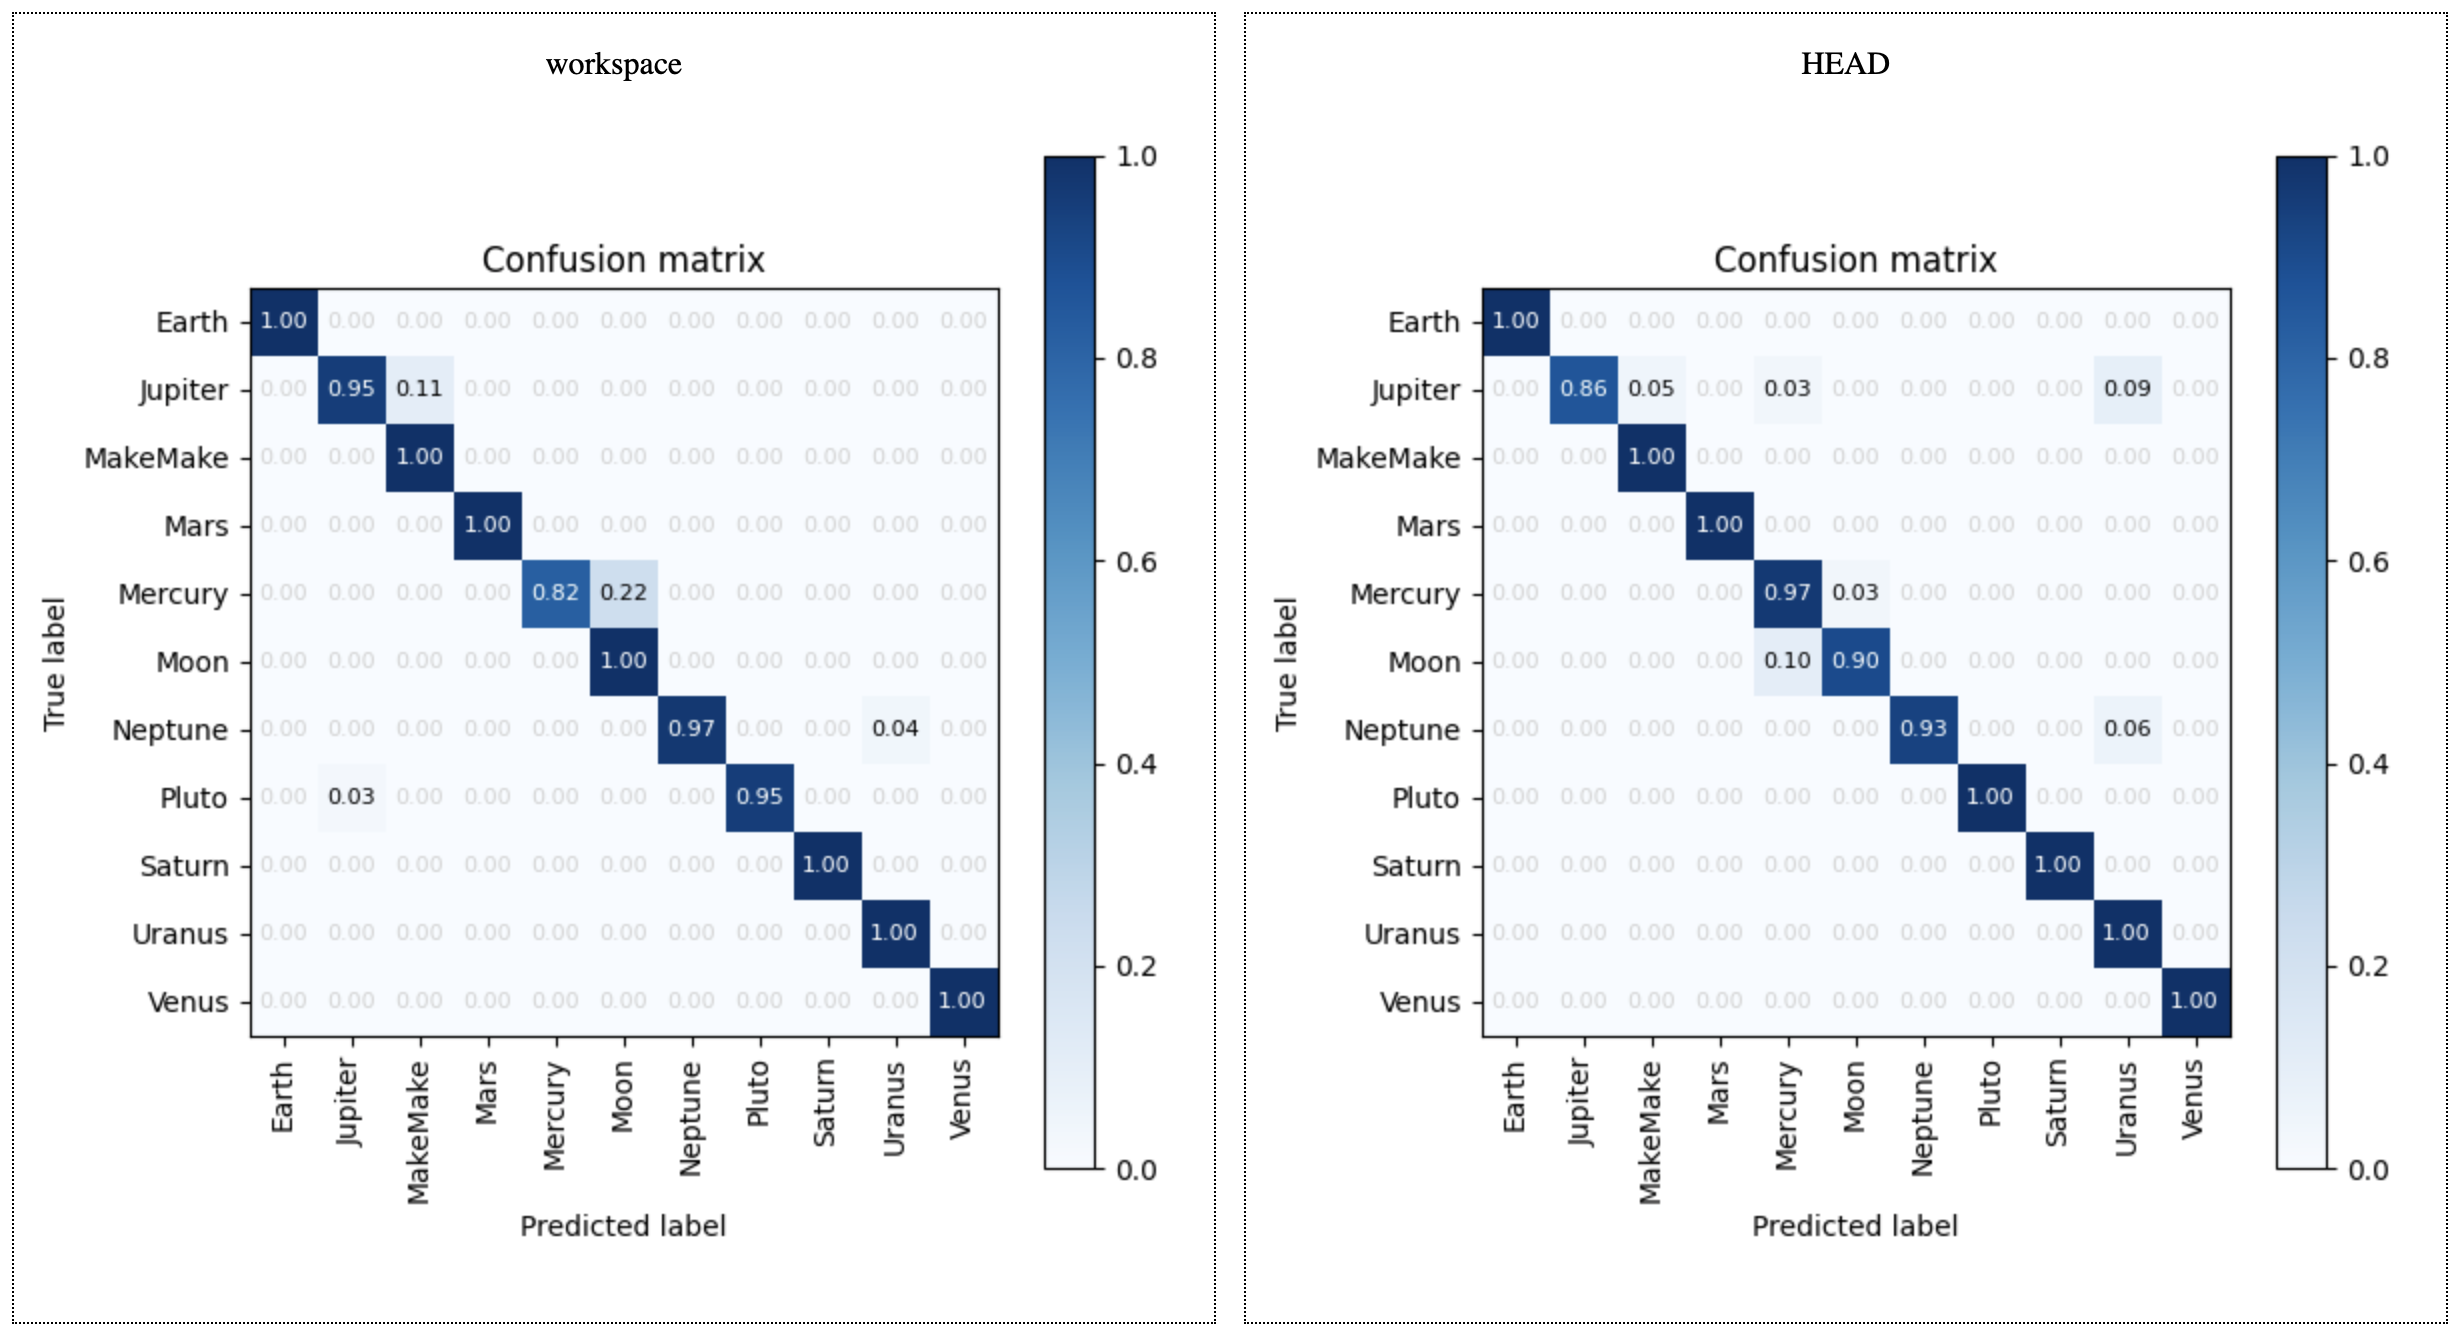
The plot shows the performance of the old (right) and new model (left). You can see if the new model has improved.
Check the changes
Check the changes with Git to ensure that all the necessary files are tracked:
# Add all the files
git add .

# Check the changes
git status
The output should look similar to this:
On branch main
Changes to be committed:
  (use "git restore --staged <file>..." to unstage)
        modified:   data/raw.dvc
        modified:   dvc.lock
Commit and push the updated data
Once you want to share the new data, commit the changes and push to DVC and Git:
# Upload the experiment data, model and cache to the remote bucket
dvc push

# Commit the changes
git commit -m "Update the experiment data"

# Push the changes
git push
Summary
In this chapter, we retrained the model using the new data we labeled in Label Studio. We downloaded the annotations, parsed them, and retrained the model using DVC. We then evaluated the new model to see if it has improved.
You fixed some of the previous issues:
- Model is retrained with the supplemental data
All the items of the MLOps process for this part are now addressed.
Take away
- Closing the loop from labeling to training is where MLOps delivers value: The real benefit of tools like Label Studio and DVC isn't in any single step, but in how they connect data labeling, model training, and evaluation into a repeatable workflow where adding new labeled data automatically triggers retraining and performance comparison.
- Automation scripts transform labels into training data: Building small
utilities like
parse_annotations.pyto convert labeling tool exports into your training format creates a bridge between annotation workflows and ML pipelines, making it trivial to incorporate new data without manual file manipulation. - DVC's intelligent caching saves time on iterations: When you run
dvc reproafter adding new labeled images, DVC automatically detects that only the data has changed and re-runs just the necessary stages (prepare, train, evaluate), skipping unchanged preprocessing steps and saving computational resources. - Visual comparison reveals whether new data helps: The
dvc plots diffcommand shows side-by-side metrics and confusion matrices from before and after retraining, making it immediately clear whether the newly labeled data improved model performance or introduced new issues that need investigation.
State of the MLOps process
- Labeling of supplemental data can be done systematically and uniformly
- Labeling of supplemental data is accelerated with AI assistance
- Model is retrained with the supplemental data
Continue to the conclusion to review what you have learned.