Chapter 5.3 - Link the model to Label Studio
Introduction
In this chapter, you will begin by creating an API for the model. Next, you will link the model you trained in the previous chapters to Label Studio using this API. This integration will enable the model to make predictions on the unlabeled data within Label Studio, rendering the labeling process "AI-assisted" and thus making it significantly more efficient.
The following diagram illustrates the control flow of the experiment at the end of this chapter:
flowchart TB
    extra -->|upload| labelStudioTasks
    labelStudioTasks -->|label| labelStudioAnnotations
    bento_model -->|load| fastapi
    labelStudioTasks -->|POST /predict| fastapi
    fastapi --> labelStudioPredictions
    labelStudioPredictions -->|submit| labelStudioAnnotations

    subgraph workspaceGraph[WORKSPACE]
        extra[extra-data/extra]
        bento_model[model/classifier.bentomodel]
        fastapi[src/serve_labelstudio.py]
    end

    subgraph labelStudioGraph[LABEL STUDIO]
        labelStudioTasks[Tasks]
        labelStudioAnnotations[Annotations]
        labelStudioPredictions[Predictions]
    end

    style extra opacity:0.4,color:#7f7f7f80
    style labelStudioTasks opacity:0.4,color:#7f7f7f80
    linkStyle 0 opacity:0.4,color:#7f7f7f80
linkStyle 1 opacity:0.4,color:#7f7f7f80Steps
Install FastAPI
Before adding the model to Label Studio, we need to create an API for the model.
Python has many packages for building web frameworks. In this guide we will use
FastAPI for its simplicity. Add the main
fastapi[standard] dependency to the requirements.txt file:
tensorflow==2.21.0
matplotlib==3.11.0
scikit-learn==1.9.0
pyyaml==6.0.3
dvc[gs]==3.67.1
bentoml==1.4.39
pillow==12.3.0
evidently==0.7.23
label-studio==1.23.0
fastapi[standard]==0.139.2
Check the differences with Git to validate the changes:
# Show the differences with Git
git diff requirements.txt
The output should be similar to this:
diff --git a/requirements.txt b/requirements.txt
index e5f490c..5735e62 100644
--- a/requirements.txt
+++ b/requirements.txt
@@ -7,3 +7,4 @@ bentoml==1.4.39
 pillow==12.3.0
 evidently==0.7.23
 label-studio==1.23.0
+fastapi[standard]==0.139.2
Install the package and update the freeze file.
Warning
Prior to running any pip commands, it is crucial to ensure the virtual environment is activated to avoid potential conflicts with system-wide Python packages.
To check its status, simply run which python. If the virtual environment is
active, the output will show the path to the virtual environment's Python
executable. If it is not, you can activate it with source .venv/bin/activate.
Create the model API
Let's start building the API which will allow Label Studio to talk with our model. Label Studio expects the following API endpoints:
- GET
/health- To check if the model is running. - POST
/setup- To configure the model API. It is useful if we have multiple models and we want to pick the right one for the task. - POST
/webhook- To start jobs such as model training from the Label Studio UI to our API. - POST
/predict- To make predictions using the model.
Let's implement these endpoints.
Create a new file src/serve_labelstudio.py and add the following code:
from __future__ import annotations

import uuid
from pathlib import Path
from typing import Dict

import bentoml
from fastapi import FastAPI
from PIL import Image

# 1. Define constants
MODEL_VERSION = "v0.0.1"
DATA_FOLDER_PATH = Path("extra-data/extra")

# 2. Initialize FastAPI app
app = FastAPI()
# Load the BentoML model
bento_model = bentoml.keras.get("celestial_bodies_classifier_model")
preprocess = bento_model.custom_objects["preprocess"]
postprocess = bento_model.custom_objects["postprocess"]
model = bento_model.load_model()


# 3. Define API endpoints
@app.get("/health")
async def health():
    return {"status": "ok"}


@app.post("/setup")
async def setup(_: Dict):
    # Currently, we don't need to do anything with the setup
    # This is why we ignore the input data
    return {"model_version": MODEL_VERSION}


@app.post("/webhook")
async def webhook():
    # Currently, we don't need to do anything with the webhook
    # It is used to start training the model from the Label Studio UI
    # Refer to:
    # https://github.com/HumanSignal/label-studio-ml-backend/blob/master/label_studio_ml/api.py#L118
    return {"status": "Unknown event"}


@app.post("/predict")
async def predict(data: Dict):
    # For request and response types, refer to:
    # https://labelstud.io/guide/ml_create#3-Implement-prediction-logic
    task = data["tasks"][0]
    # This is a simplification to get the filename from the image id.
    # In a real-world scenario, you would store the image on S3
    # and fetch it here.
    filename = "".join(task["data"]["image"].split("-")[1:])
    image_path = DATA_FOLDER_PATH / filename
    image = Image.open(image_path)

    preprocessed_image = preprocess(image)
    prediction = model.predict(preprocessed_image)
    result = postprocess(prediction)
    prediction = result["prediction"]
    score = result["probabilities"][prediction]
    print(score, type(score))

    return {
        "results": [
            {
                "model_version": MODEL_VERSION,
                "score": score,
                "result": [
                    {
                        "value": {"choices": [prediction]},
                        "id": str(uuid.uuid4()),
                        "from_name": "choice",
                        "to_name": "image",
                        "type": "choices",
                    }
                ],
            }
        ],
    }
This file is structured in 3 parts:
- Definition of some useful constants.
- Creation of the FastAPI app and loading of the model similarly to BentoML
src/serve.py. - Definition of the API endpoints required by Label Studio.
Note
We do nothing with the /setup and /webhook endpoints as we do not need the
functionality they offer. However, they are still required to exist for the
model to work with Label Studio. If you would like to go further, please refer
to the
Label Studio ML integration documentation.
Check the changes
Check the changes with Git to ensure that all the necessary files are tracked:
# Add all the files
git add .

# Check the changes
git status
The output should look like this:
On branch main
Changes to be committed:
  (use "git restore --staged <file>..." to unstage)
        modified:   requirements-freeze.txt
        modified:   requirements.txt
        new file:   src/serve_labelstudio.py
Commit the changes to Git
Commit the changes to Git:
# Commit the changes
git commit -m "Add FastAPI integration to Label Studio"
Run the model API
Run the model API by executing the following command:
The FastAPI server will start at http://localhost:8000 and you can view the documentation at http://localhost:8000/docs.
Make sure to keep the server running in the background for the next steps.
Add the model to Label Studio
Make sure Label Studio is running at http://localhost:8080.
-
Click on the Settings button on the top right corner of the screen and select Model from the sidebar.
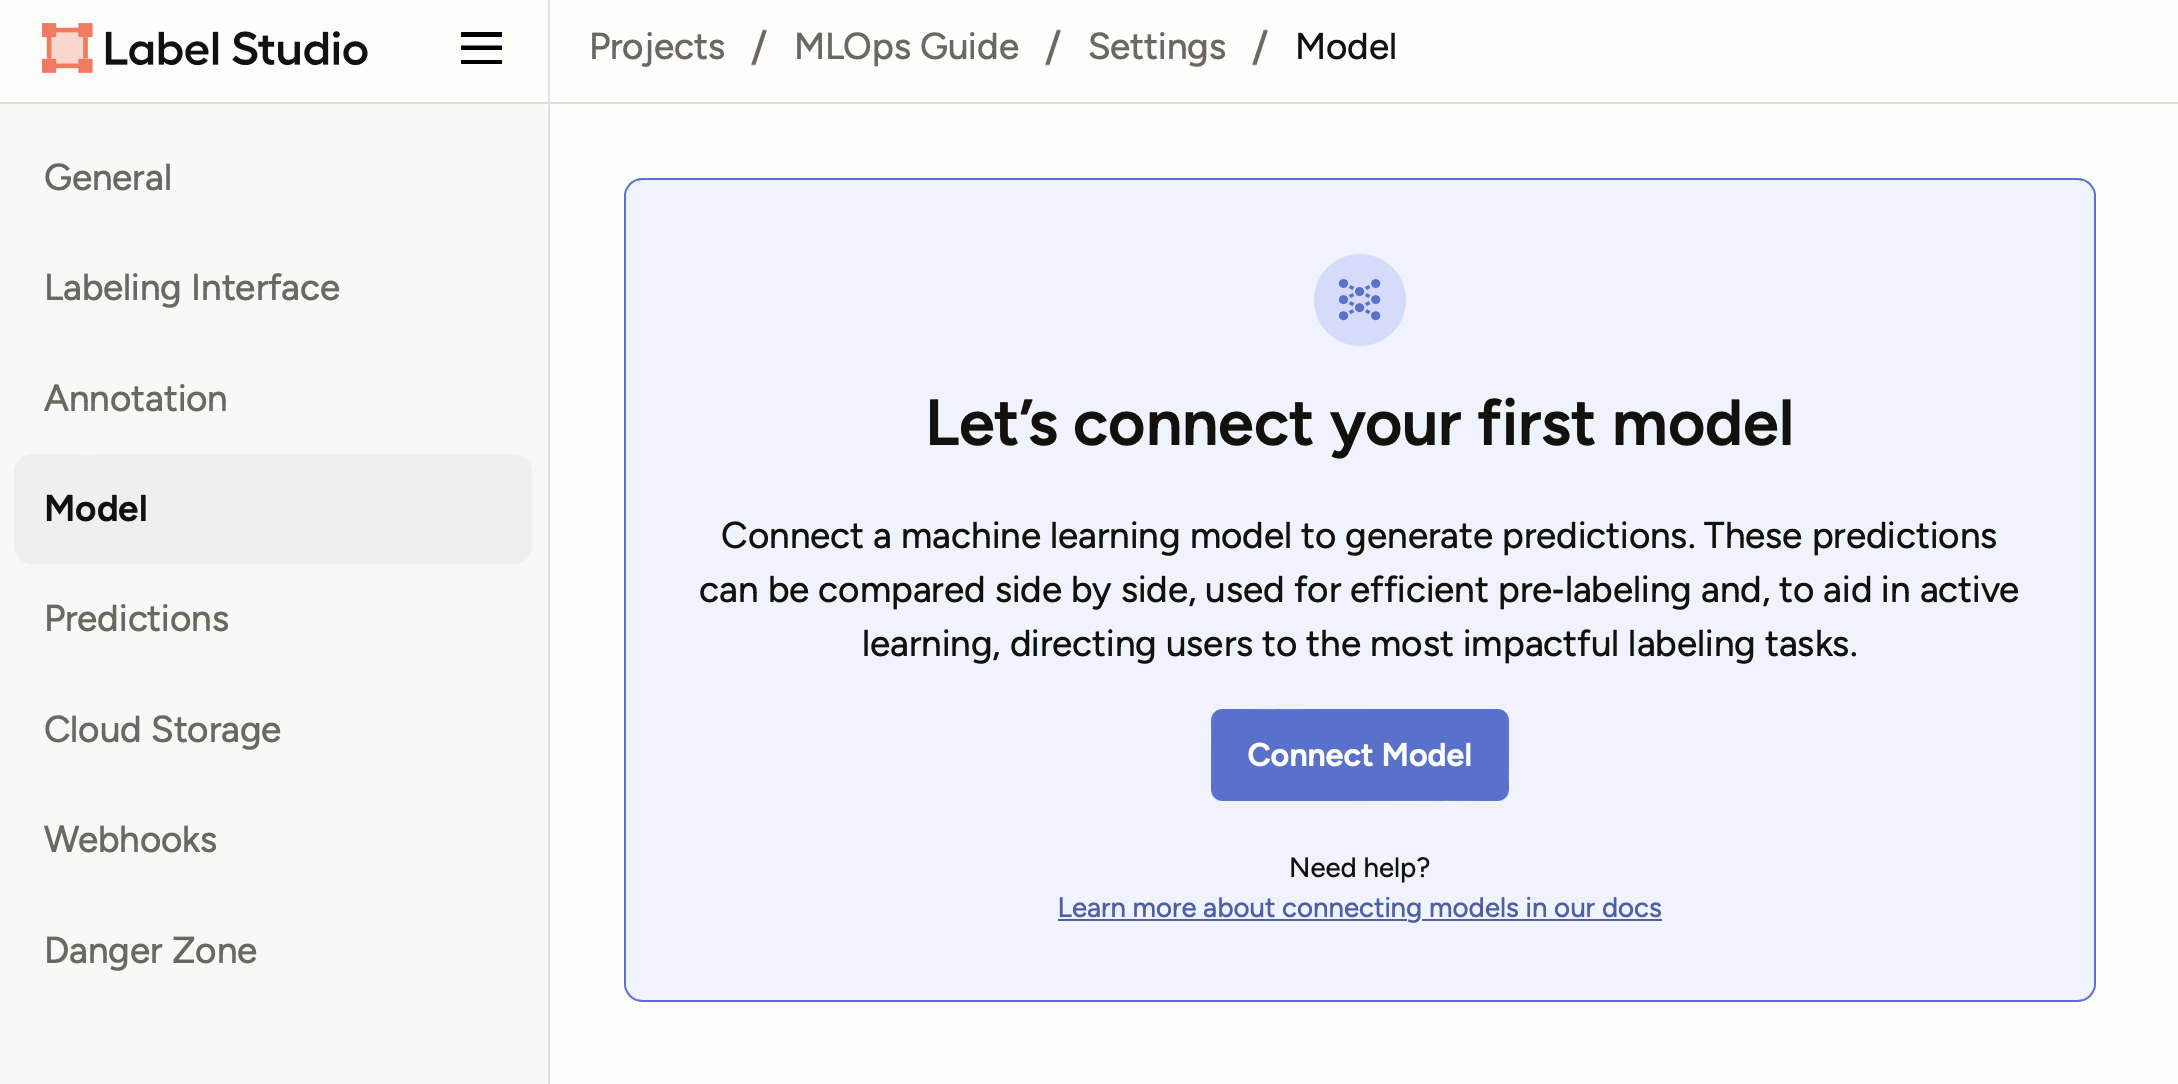
-
Click on the Connect Model button and enter the following details:
- Name:
celestial_bodies_classifier_model - Backend URL:
http://localhost:8000
It should look like this:
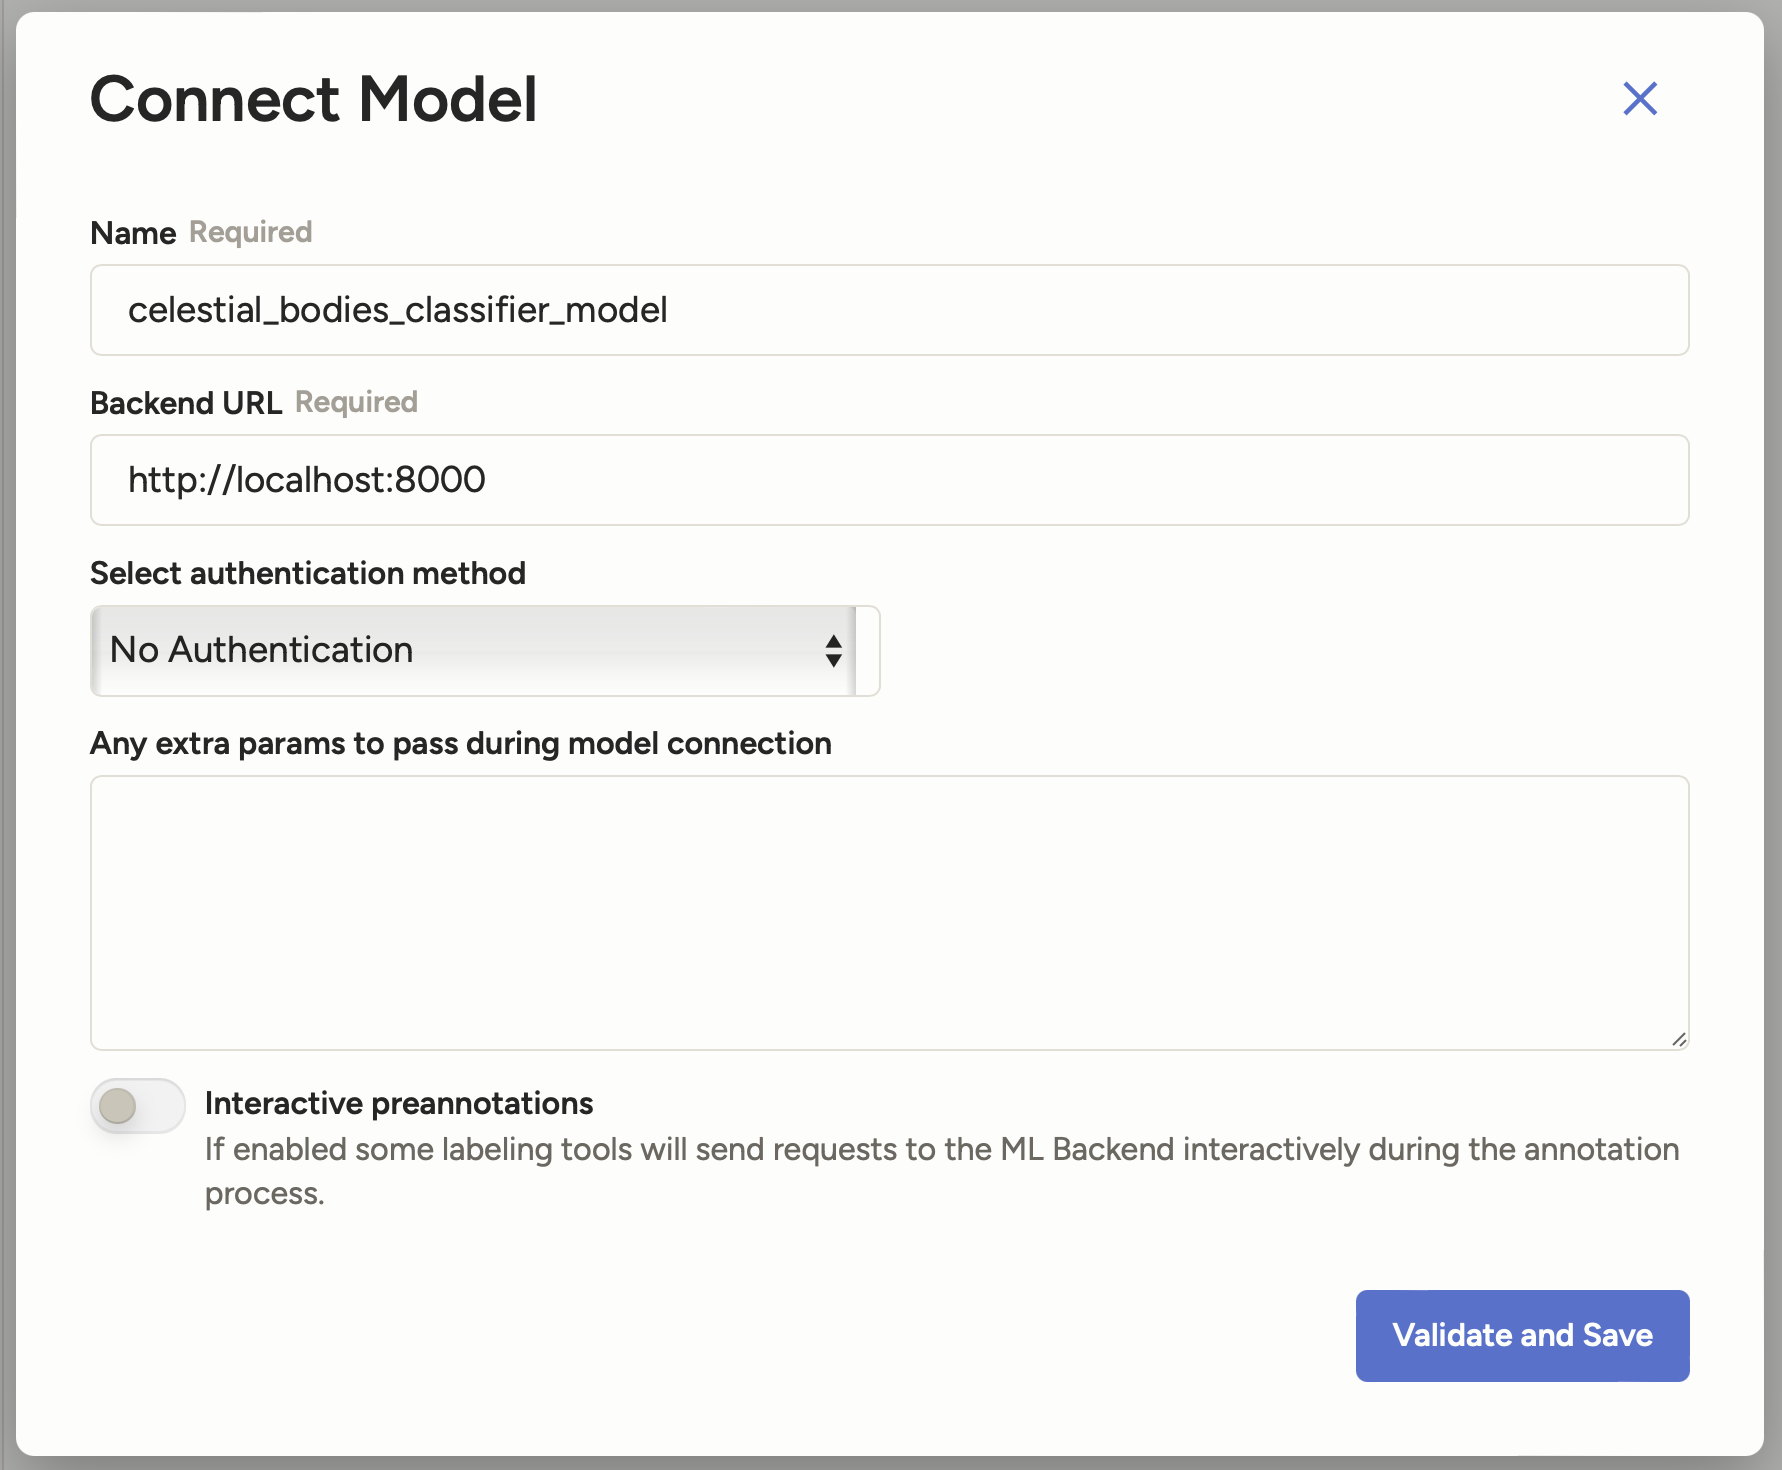
- Name:
-
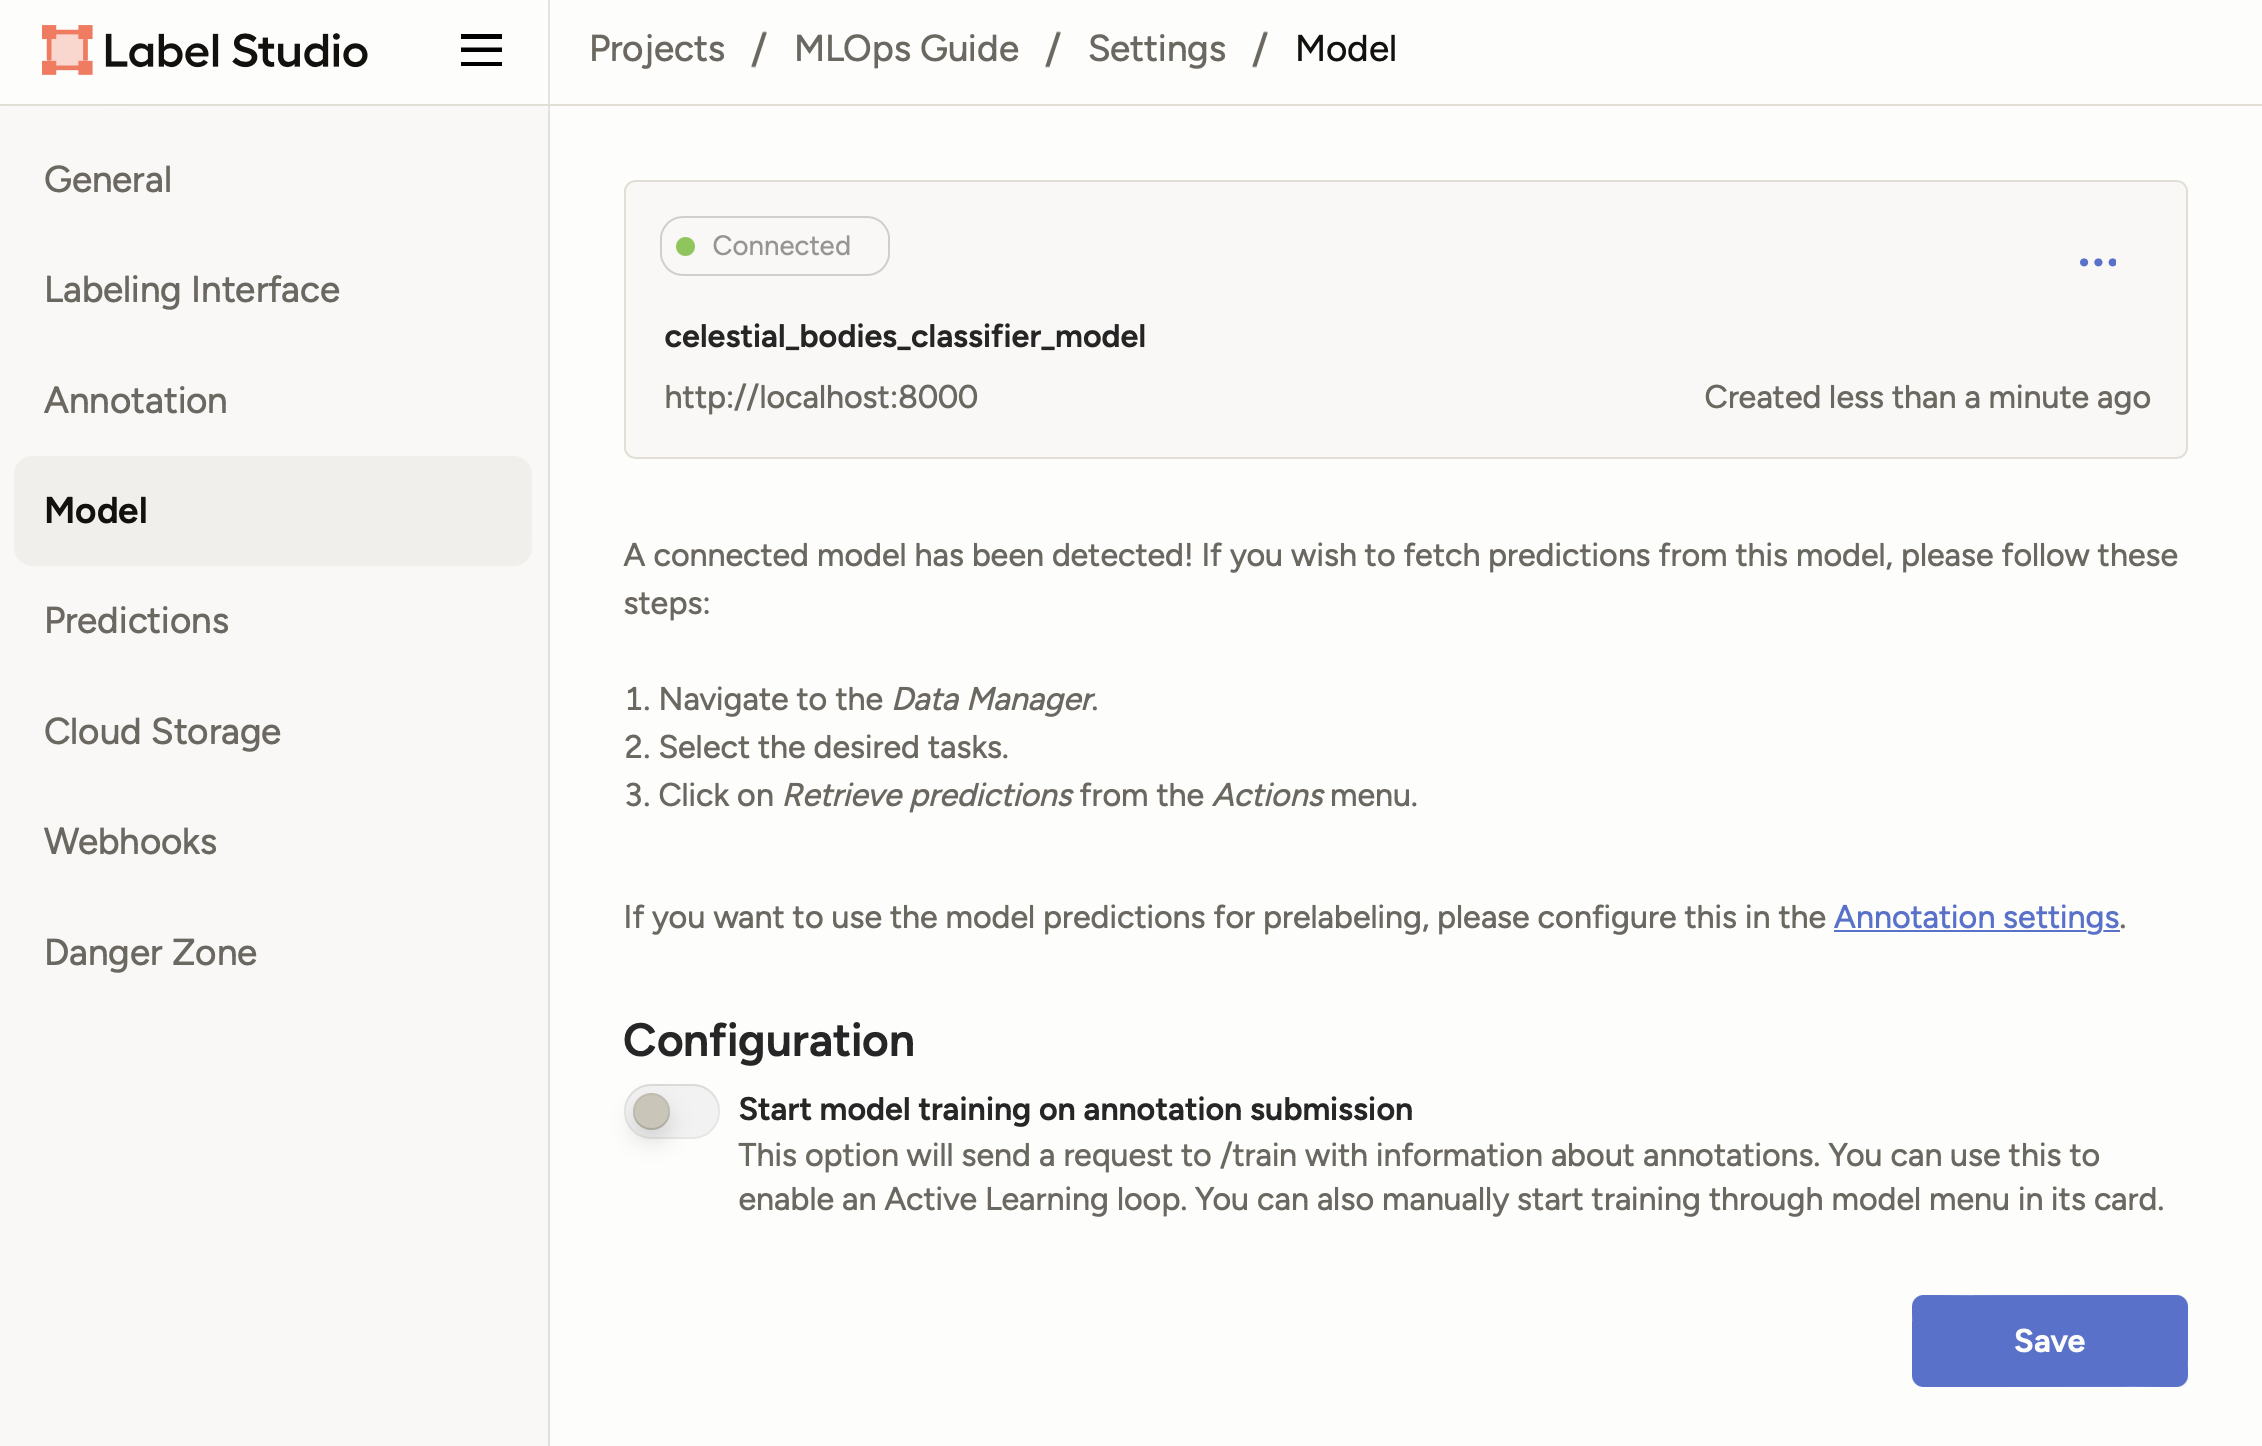
Click on Validate and Save to add the model.
You should now see your model with a status of Connected:
Label with the model
Now that the model is connected, you can start labeling the data.
-
Click on your project name on the top navigation bar to go back to the project view.
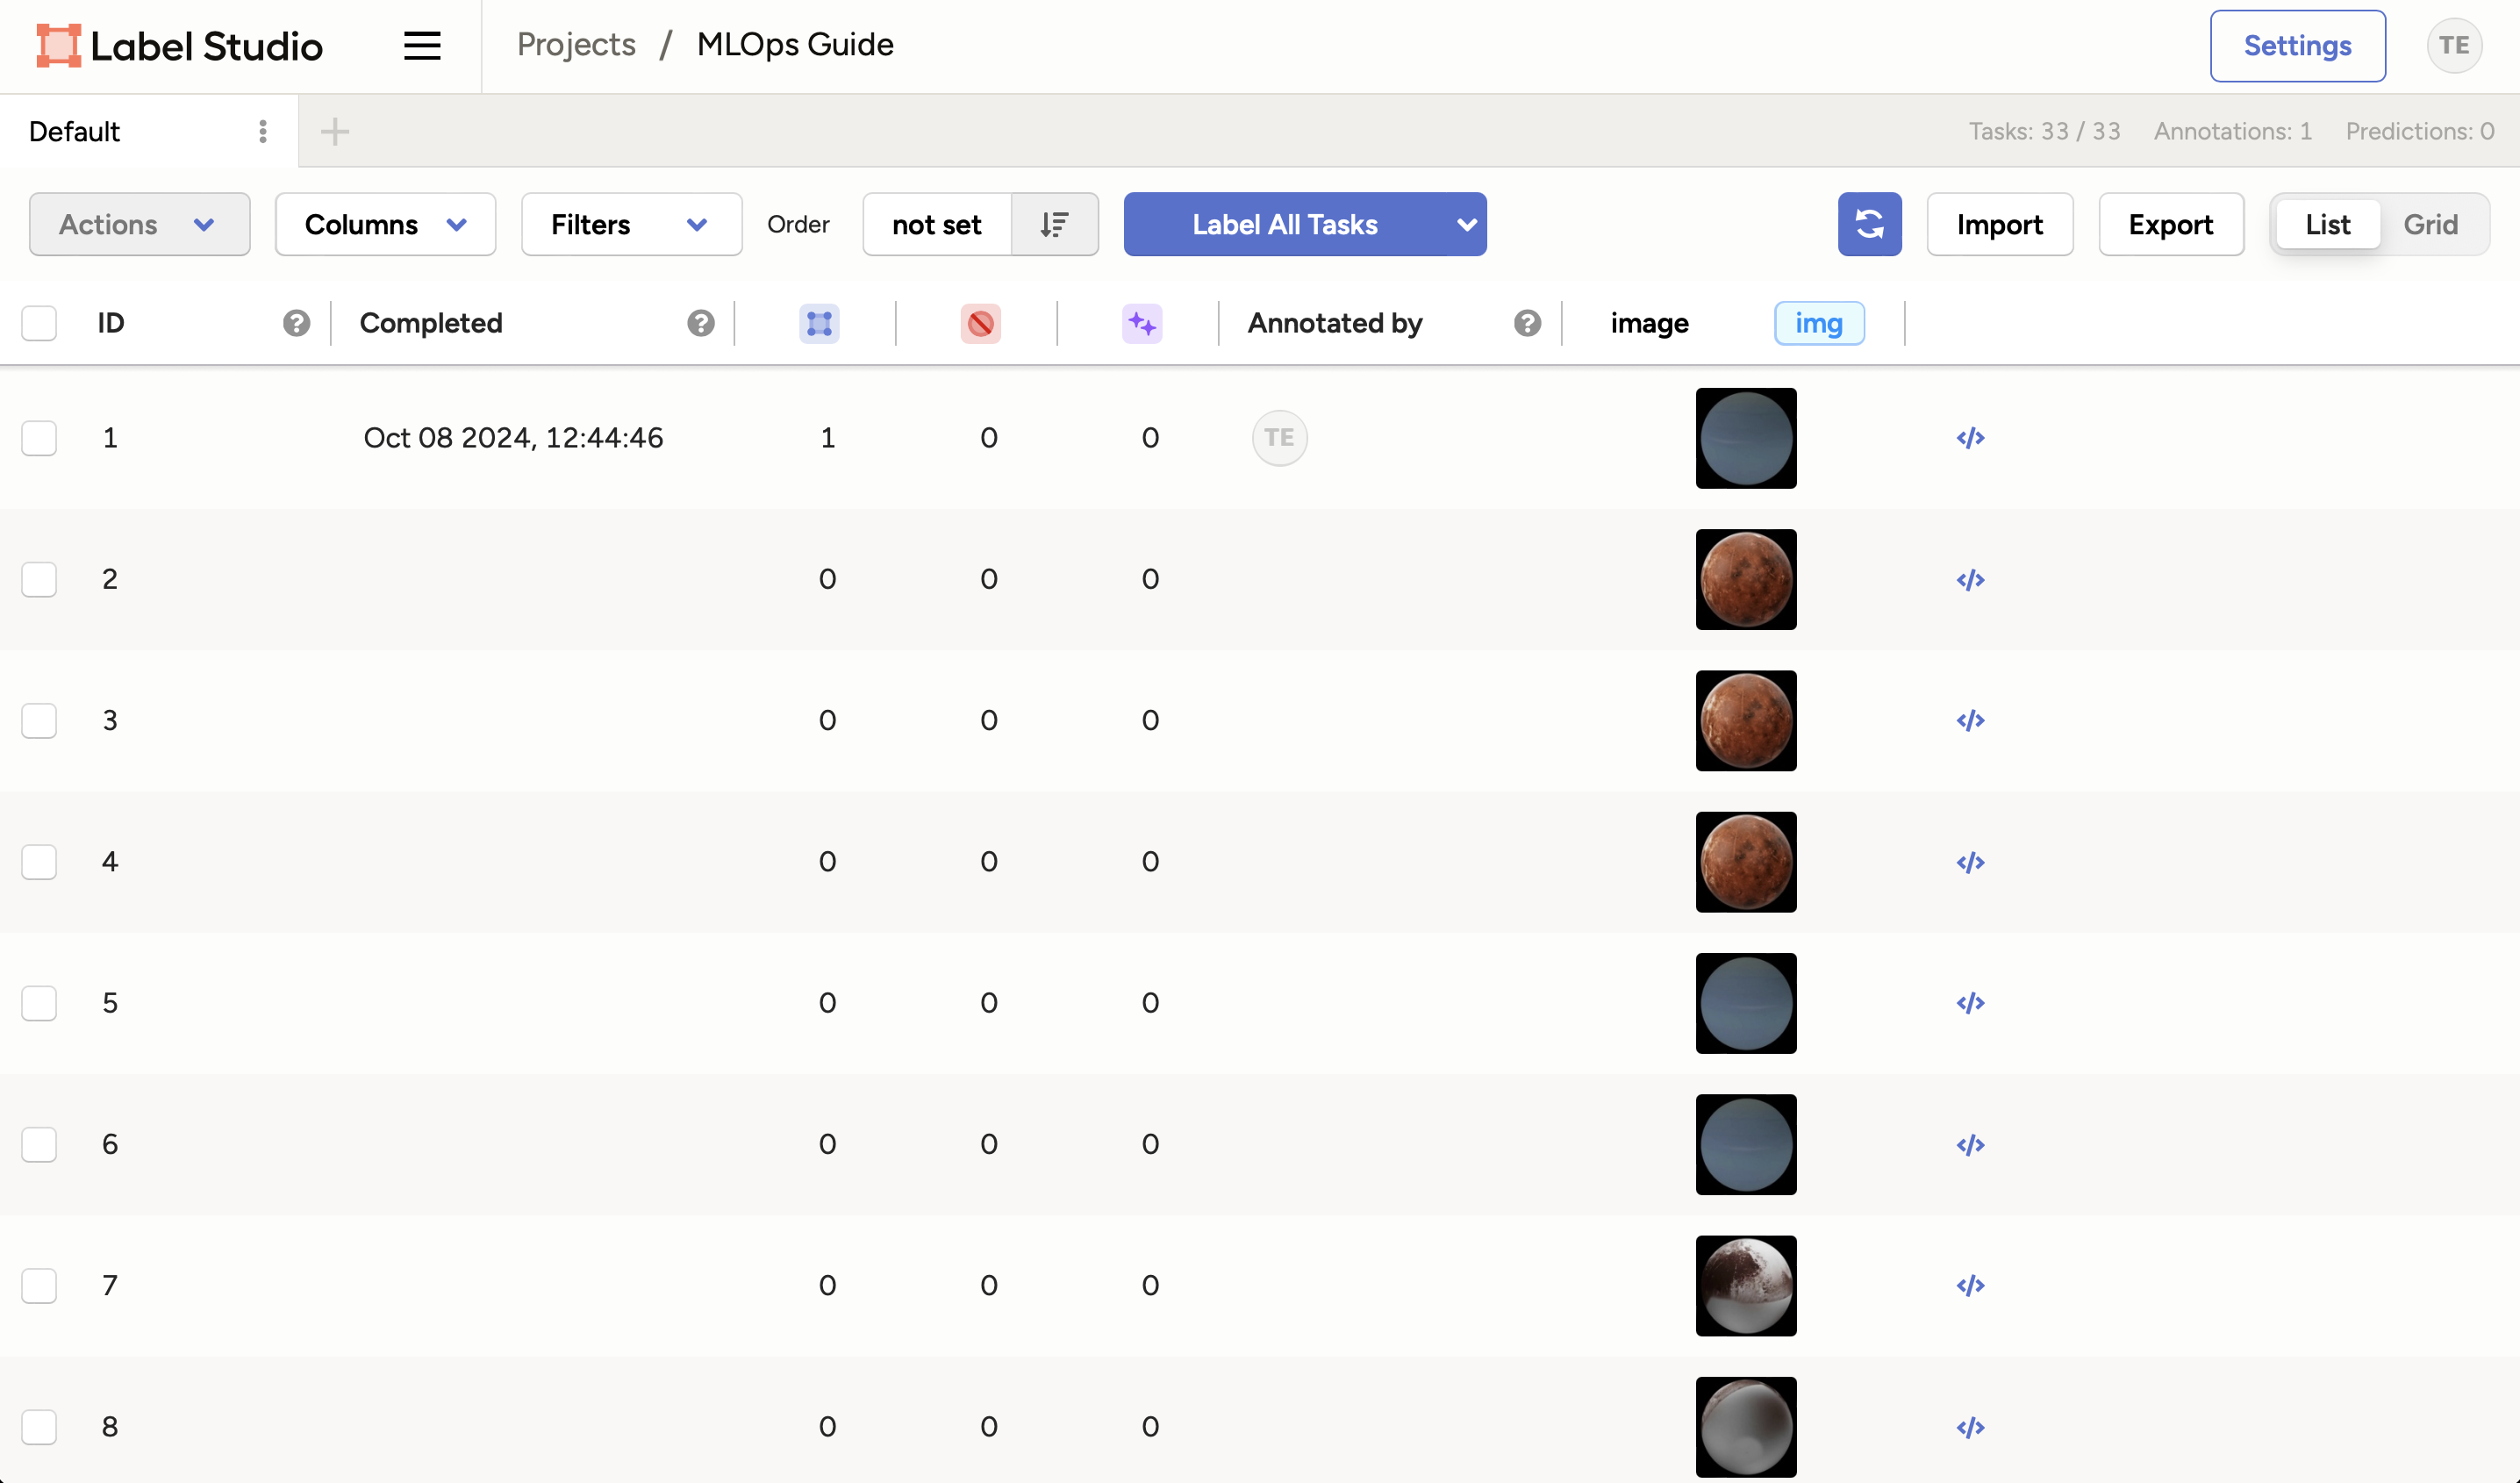
-
Click on the Label All Tasks button to start labeling the data. This will resume the labeling process from where you left off.
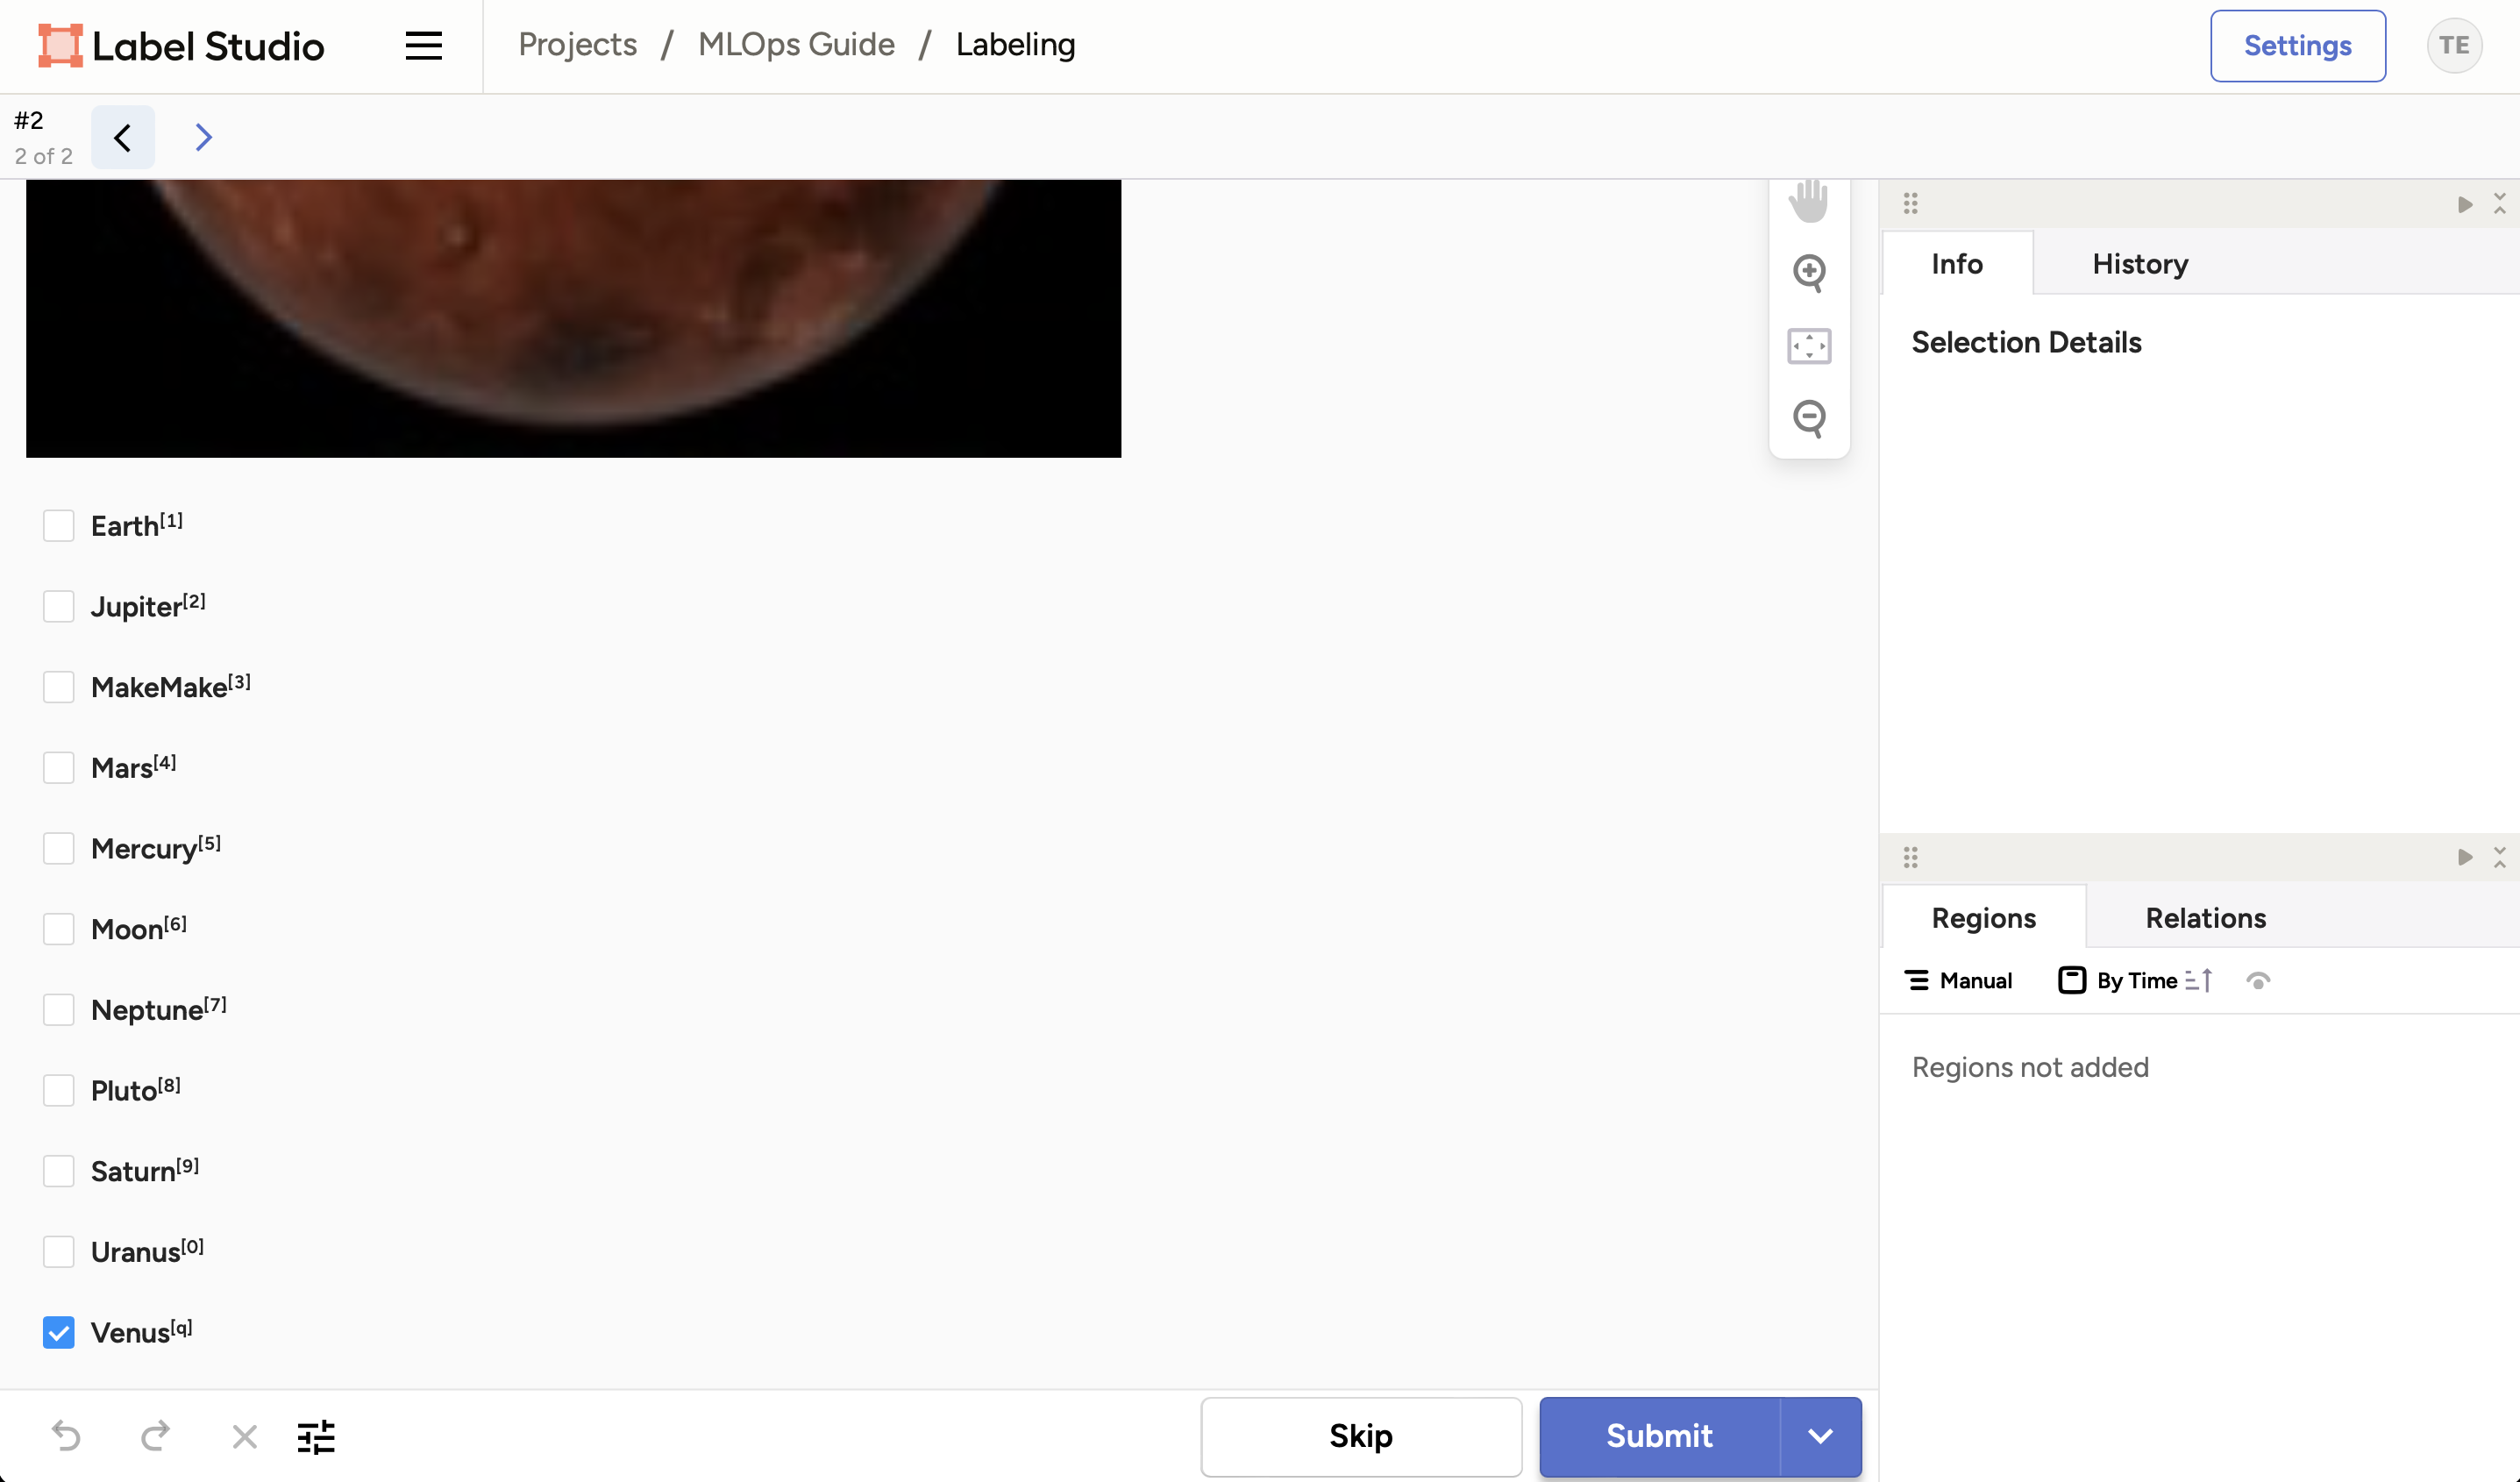
You should now see the image has been labeled automatically by the model:
-
Review the prediction and make any necessary corrections.
-
Click on the Submit button to save the annotation.
Labeling every image by hand does not scale. The next section shows how to label the remaining data more efficiently with active learning.
Label the rest with active learning
Instead of labeling images one by one, you can retrieve predictions for all remaining tasks at once and focus your review on the samples the model is least certain about. This is a simple form of uncertainty sampling, a common active-learning strategy.
- In the project view, select all tasks by checking the ID box at the top of the task list.
- Open the batch actions dropdown and select Retrieve Predictions then click OK. The prediction process can take a few minutes.
-
Go to Settings > Annotation Settings, and in the Prelabeling section, select the predictions set created by the batch (by default
v0.0.1 (1000 predictions)) as opposed to the connected model.Info
The prediction count in the dropdown can take a few minutes to update while Label Studio processes the batch. Wait until the number reflects all remaining tasks before continuing.
-
Once the predictions have been fetched, click on Columns and add the Prediction Score column to the view.
- Sort the tasks by Prediction Score in ascending order so the lowest-confidence predictions appear at the top of the list.
- Open the dropdown menu and select Label Tasks As Displayed.
With the lowest-confidence predictions at the top of the labeling queue, review and correct them first. Those are the labels that help the model improve fastest.

Warning
While AI-assisted labeling can significantly speed up the labeling process, it is important to be aware of its limitations. Human labelers might become overly reliant on the model's predictions and accept them without proper verification, especially when dealing with large datasets over extended periods. This can lead to inaccuracies in the labeled data.
To mitigate this risk, consider implementing cross-labeling, where multiple labelers annotate the same data and discrepancies are reviewed. This ensures higher accuracy and reliability of the labeled data.
Summary
Wow! You have successfully linked the model to Label Studio. You can now use the model to make predictions on the data you have in Label Studio to speed up the labeling process. In the next chapter, we will retrain the model using the new data we have labeled.
You fixed some of the previous issues:
- Labeling of supplemental data is accelerated with AI assistance
Take away
- AI-assisted labeling creates a virtuous cycle: Using your model to pre-label data speeds up annotation, which generates more labeled data to retrain the model, which improves pre-labeling quality. This feedback loop is central to continuous learning systems but requires careful monitoring to prevent error propagation.
- Model serving requires more than inference logic: Building a
production-ready model API means implementing health checks, configuration
endpoints, and proper error handling, not just a
/predictendpoint, to enable robust integration with downstream systems like Label Studio. - BentoML's custom objects enable end-to-end integration: Packaging preprocessing and postprocessing functions with the model means the serving layer automatically handles image transformation and probability decoding, eliminating the need to duplicate data processing logic between training and serving code.
- Automation bias is a real risk in AI-assisted workflows: When human labelers see model predictions pre-filled, they may anchor to those suggestions and accept incorrect labels without proper scrutiny, especially under time pressure or with large datasets. Implementing cross-labeling and quality checks helps mitigate this risk.
State of the MLOps process
- Labeling of supplemental data can be done systematically and uniformly
- Labeling of supplemental data is accelerated with AI assistance
- Model needs to be retrained using higher-quality data
Continue to the next chapters to address the remaining items.